Wound Management for Veterinary Technicians
 Figure 1: Mass removal in this patient resulted in a large central defect and incomplete wound closure. This patient was managed with regular bandage changes until primary wound closure was possible.
What You Should Know About Wound Care Fundamentals
Veterinary patients may present to the hospital with a wide variety of wounds. These may include burns, bite wounds, pressure sores (decubital ulcers), severe dermatitis, or trauma such as gunshot wounds, lacerations, or degloving injuries caused by motor vehicles or other factors (Figure 1).
In this article, we will go over some of the basics of wound care, as well as some best practices for treatment that veterinary technicians can perform in the practice.
Classify and Assess the Wound
Every animal should be stabilized and thoroughly examined to determine extent of damage prior to definitive wound care. Basic wound care begins with appropriate multimodal analgesia, followed by sedation or general anesthesia as deemed necessary. Always wear gloves while handling patient wounds.
Wounds may be classified into one of four different categories:
- Class I: “Clean” surgical incisions that do not enter contaminated areas such as the alimentary, urogenital, or respiratory tracts.
- Class II: “Clean-contaminated” wounds include surgery of the alimentary, urogenital, or respiratory tracts in a controlled operative environment.
- Class III: “Contaminated” wounds encompass recent open wounds such as a gunshot or contamination occurring under controlled circumstances, such as releasing gastrointestinal contents into the abdominal cavity during laparotomy.
- Class IV: “Dirty” wounds include chronic or traumatic wounds with necrotic tissues or the presence of infection.
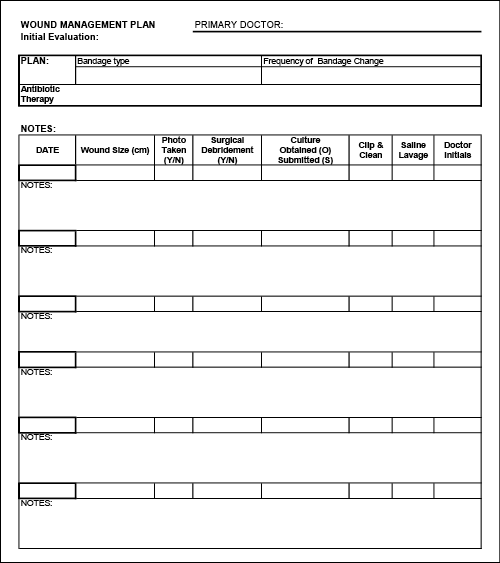
Wound care should commence as soon as possible, while following the principles of debridement, controlling infection or inflammation, and maintaining moisture balance. Additionally, careful record keeping is imperative for wounds undergoing long-term management (Figures 2A and 2B).
The period of time in which wound contamination levels are below 105 organisms per gram of tissue is known as the “golden period.” In the 1970s, this period was deemed to be less than six hours. Since then, the golden period has been redefined. In humans, for example, wounds on the head and face are associated with significantly lower infection rates than on other parts of the body and may be successfully closed 24–48 hours after trauma. Regardless, primary closure of heavily contaminated wounds is not advised.
 Figure 2A: Wound healing should be meticulously documented to ascertain patient progress. Photographs that include labeled disposable paper rulers are invaluable and help create a timeline with wound dimensions. Wound photographs should be uploaded into the patient’s medical file..
 Figure 2B: (Example wound progress chart) Wound healing charts should include the patient’s name, date, wound dimensions, and progress notes. Listing topical wound treatments and bandage material requirements help eliminate waste when handling patients with multidrug-resistant (MDR) infections. Click here to download
Lavage and Culture
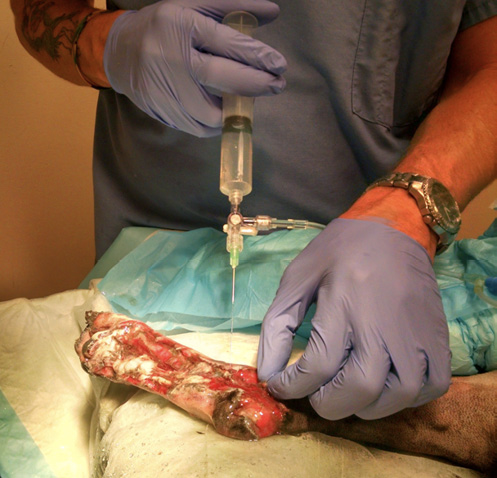
The old adage “the solution to pollution is dilution” is applicable to wound management. Lavage is an effective means of clearing debris and reducing bacterial loads in wounds. Isotonic saline is the least toxic to healing tissues, but clean water can suffice in a pinch. The recommended pressure for wound lavage is 8 pounds per square inch, which can be achieved using a 35-mL syringe connected to a 19-gauge needle (Figure 3).
Dilute 0.5% chlorhexidine diacetate has sustained residual activity against a broad spectrum of bacteria. Povidone-iodine is an effective antiseptic but has limited residual activity and is inactivated by purulent material. Avoid using hydrogen peroxide or surgical scrub agents as they are toxic to healthy tissue.
A wound culture obtained immediately following lavage will most likely represent remaining bacterial populations. If prior surgery was performed, obtaining cultures before wound lavage will help identify potential hospital-acquired infections. Broad spectrum antibiotics such as a first-generation cephalosporin should be considered for all infected or puncture wounds.
Drainage and Coaptation
Adequate hair removal is imperative and should encompass a large margin surrounding all wounds. An effective means of preventing hair contamination into the wound involves the use of sterile lubricant, such as KY Jelly. Sterile lubricant can be applied directly into the wound to create a barrier over the underlying tissue. Sterile gauze may be combined with the sterile lubricant to prevent shorter hairs from entering the wound.
Wounds with large amounts of dead space may require a Penrose or Jackson-Pratt (JP) drain. Surgical drains should be placed with gravity in mind but should not be incorporated into the incision line. JP drains are considered active as suction is necessary to pull fluid from the wound, whereas Penrose drains are passive and rely on gravity for drainage to occur (fluid emanates from around the edge of a Penrose drain). Drains should be removed as soon as possible, often 5–7 days after wound closure.
 Figure 3: A simple wound lavage system was created using a 35-mL syringe connected to a 19-gauge needle. Refilling the lavage syringe was simplified by incorporating a 3-way stopcock, saline bag, and IV drip set.
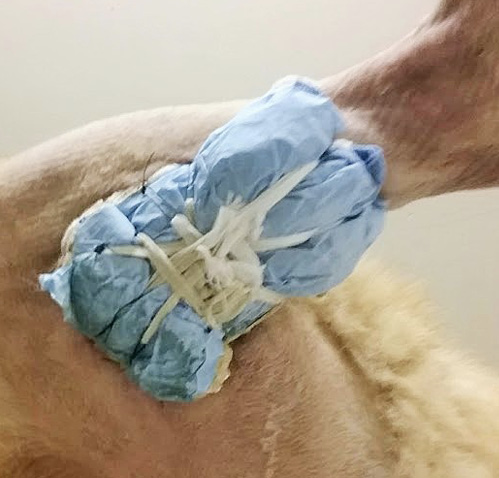
 Figure 4: A tie-over bandage may be used to cover anatomic areas considered difficult to bandage. Preplaced surgical suture loops surround the wound. Criss-crossing umbilical tape is used to secure lap sponges or gauze over the wound defect. Ideally, additional protection consisting of a moisture impervious covering (such as Ioban) should be used over the top of this bandage..
Bandages are required for protecting open wounds from environmental contamination. Soft-padded bandages may be used for extremities, whereas tie-over bandages are ideal for areas considered difficult to bandage (Figure 4).
Table 1: Primary Contact Layers and Their Uses |
|
|
The purpose of the primary contact layer or wound dressing is to create an environment that promotes wound healing. CLICK HERE TO VIEW TABLE 1 |
|
Bandages consist of a primary (contact) layer, a thick absorbent secondary (intermediate) layer, and a tertiary (outer) layer. There are many options and products available for the primary contact layer (see Table 1). In cases of highly exudative wounds, the bandage should be changed as soon as strikethrough occurs.
Healing
There are four distinct phases of wound healing (see Table 2). Wound healing can be impacted by advanced age, obesity, certain nutritional deficiencies (carbohydrates, proteins, zinc, and vitamins A, B, and C), dehydration, immune impairment, chronic disease, or radiation therapy. Therefore, adjunct wound therapies may be engaged for managing chronic wounds.
Prior to the widespread use of antibiotics, biotherapies such as medicinal maggots and leeches were used to remove devitalized tissue and reduce wound congestion. Wound vacuums, acellular fish skin grafts, extracorporeal shock wave therapy, and hyperbaric oxygen have also demonstrated good success in dealing with delayed healing or chronic wounds.
Clients should be provided with verbal and written instructions regarding all aspects of bandage or wound care. Clients should understand the importance of preventing the patient from molesting the wound and/or bandage. A properly fitted Elizabethan collar is essential, but physical barriers such as a t-shirts can be employed for wounds on the chest or abdomen.
Veterinary technicians are an integral part of patient wound care. Technicians are the primary source of communication between the client and veterinarian and should be fully utilized in the practice to maximize compliance and client education.
Table 2: Phases of Wound Healing |
|
|
|
 |
Heidi Reuss-Lamky graduated from Michigan State University’s Veterinary Technology Program and has extensive experience as a surgical technician. She is currently affiliated with Oakland Veterinary Referral Services in Bloomfield Hills, Michigan. She is a founding member of the Academy of Veterinary Surgical Technicians, where she sits on the executive board. She serves in many professional roles, including as a member of the NAVTA Committee on Veterinary Technician Specialties and a Fear Free Elite Certified Professional. |
Photo credits: Photos courtesy of Heidi Reuss-Lamky


